Running LLM and GenAI on Intel Arc GPU
Make use of Intel Arc Series GPU to run Open WebUI with Ollama to interact with Large Language Models (LLM) and Generative AI (GenAI)
Introduction
Have you ever dreamed of having a personal AI companion that can assist with tasks, generate ideas, or even create art? Imagine being able to bring your creative visions to life with ease, leveraging the power of artificial intelligence to streamline your workflow and enhance your productivity.
As a software engineer, you’re likely no stranger to the world of code and innovation. But have you ever considered taking your AI skills to the next level by running your own chatbots, generative AI systems, or content generation tools? With the rise of deep learning and natural language processing, the possibilities are endless, and the potential for creativity and automation is vast.
While online services like ChatGTP and Perplexity offer a glimpse into the world of AI development, they also present limitations. Running your own AI systems allows you to tailor solutions to your specific needs, integrate with existing tools, keep your privacy, and push the boundaries of what’s possible.
After reading this post series, you’ll understand how to:
- Seamlessly deploy a single Docker-based solution that integrates all necessary components
- Leverage the user-friendly interface of Open WebUI for easy model management and deployment
- Unlock the full potential of Large Language Models (LLM) with Ollama’s advanced integration capabilities
- Streamline Stable Diffusion capabilities with SD.Next’s optimization tools
- Maximize performance and efficiency using Intel Arc Series GPUs and Intel Extension for PyTorch
TL;DR
For developers who prefer to dive straight into the code, I’ve got you covered! The docker-based deployment solution is available on GitHub. Simply click this link to access the code repository and start building your own AI-powered workflow today.
Requirements
- GPU: Intel Arc Series
- Operating System: Linux
- Container Management: Podman or Docker
- Python: Version 3.10 or higher
Ollama
Our solution’s backbone is built around a powerful LLM engine, which we will utilize Ollama for. Fortunately, the installation process of this tool is thoroughly documented in their GitHub repository.
Unfortunately, our primary goal of utilizing an Intel Arc Series GPU poses a challenge. While Ollama supports multiple GPUs, Intel Arc is not yet natively supported.
Lucky for us, the Intel team is actively addressing this issue by providing pre-configured docker images that include all necessary drivers and setup for a seamless experience. So we will make use of this work.
Our first task is to create a docker-compose.yml file, with an Ollama service using Intel’s official docker image.
Inside this file, we want to configure the devices property to allow access to our GPU. This can be done through the /dev/dri directory.
For volumes, let’s create a new named volume to persist model downloads from Ollama outside the Docker container. This ensures that we can rebuild the container from scratch without losing access to large model files.
In the ports section, let’s expose port 11434, which is used to allow external tools to connect to the Ollama API. Open WebUI uses this port to connect.
In the environment section we define the environment variables required to enable Intel Arc.
We will end our configuration file by adding a comand that runs inside the container to start up Ollama as soon as the container is ready.
The docker-compose.yml file should look like this, take note that we’re calling our container ollama-intel-arc:
1
2
3
4
5
6
7
8
9
10
11
12
13
14
15
16
17
18
19
20
21
22
23
version: '3'
services:
  ollama-intel-arc:
    image: intelanalytics/ipex-llm-inference-cpp-xpu:latest
    container_name: ollama-intel-arc
    restart: unless-stopped
    devices:
      - /dev/dri:/dev/dri
    volumes:
      - ollama-volume:/root/.ollama
    ports:
      - 11434:11434
    environment:
      - no_proxy=localhost,127.0.0.1
      - OLLAMA_HOST=0.0.0.0
      - DEVICE=Arc
      - OLLAMA_INTEL_GPU=true
      - OLLAMA_NUM_GPU=999
      - ZES_ENABLE_SYSMAN=1
    command: sh -c 'mkdir -p /llm/ollama && cd /llm/ollama && init-ollama && exec ./ollama serve'

volumes:
  ollama-volume: {}
Take it for a spin. Save this file in a new folder and then run podman compose up. It should show the Ollama logs in the console.
You can now try to access Ollama API on the port we exposed:
1
curl http://localhost:11434
Now go ahead and connect to the Ollama container, you need to run this command:
1
podman exec -it ollama-intel-arc /bin/bash
Once connected, you can run the Ollama service to download our first LLM. Let’s run deepseek, one of the models supported by Ollama.
1
/llm/ollama/ollama run deepseek-r1:1.5b
Once the model downloads, you are presented with a prompt, where you can ask the model anything you like.
But if you’re a software developer, you might want to build your own chatbot. One of the simplest ways of building a chatbot is by using Gradio. Let’s write some Python code for this:
1
2
3
4
5
6
7
8
9
10
11
12
13
14
15
16
17
18
19
20
21
22
23
24
25
26
27
28
29
30
31
32
33
34
35
36
import requests
import json
import gradio as gr

url = "http://localhost:11434/api/generate"

headers = {
    'Content-Type': 'application/json'
}

def generate_response(prompt):
    data = {
        "model": "deepseek-r1:1.5b",
        "stream": False,
        "prompt": prompt
    }

    response = requests.post(url, headers=headers, data=json.dumps(data))

    if response.status_code == 200:
        response_txt = response.text
        data = json.loads(response_txt)
        actual_response = data["response"]
        return actual_response
    else:
        print("Error:", response.status_code, response.text)

iface = gr.Interface(
  fn=generate_response,
  inputs=["text"],
  outputs=["text"]
)

if __name__ == "__main__":
    iface.launch()
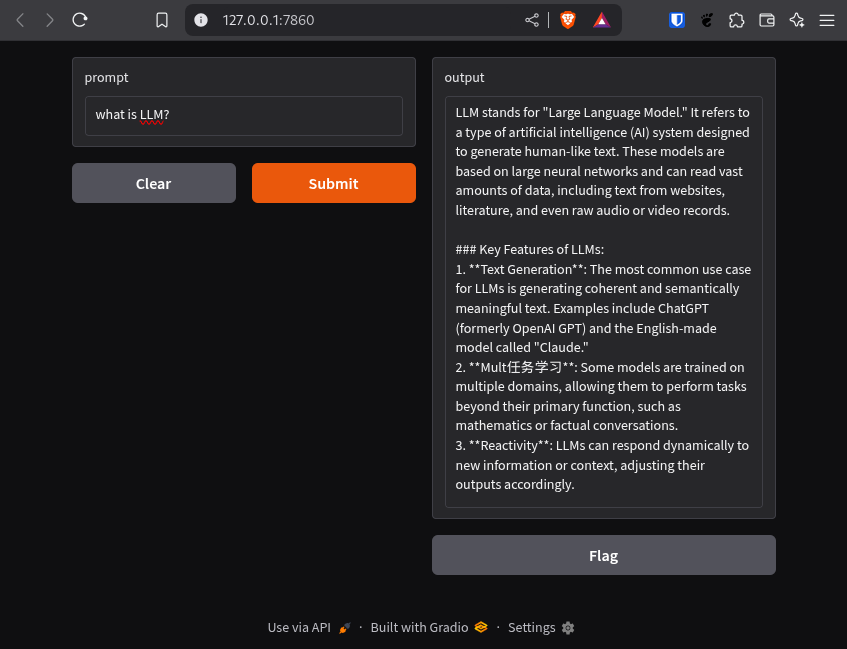
That’s all the code you need to get started. Create a python virtual environment, install the requests and gradio packages, and give it a try:
Now you have access to Ollama, you’ve been able to see how to download pre-trained models and running queries on them. You also learned how to quickly build your first chatbot using Python.
In the second part of this post series, we’ll dive into the world of Generative AI, and we’ll be putting Stable Diffusion to the test. This powerful deep learning text-to-image model will allow us to generate stunning visual content from simple text prompts.
References
GitHub Repository: https://github.com/eleiton/ollama-intel-arc